Tuesday, April 17, 2007
Old-school Setup
If you followed the previous post, you now need to navigate Windows Explorer to your new custom directory. In this file, start a new empty text file and call it
Now to start altering your AutoCAD files. At this point I'd like to point out the necessity of backing up your original files. It's easy for the best programmer to make a silly mistake, so get into the habit of copying your working files.
Ok, point your file browser to your AutoCAD installation directory (usually C:\Program Files\AutoCAD 2008\ ). In the Support directory you will find a file called acad2008doc.lsp
Make a copy of this file in the same directory and rename it to acad2008doc.orig
Open the acad2008doc.lsp file and scroll riiiiiight down to the bottom.
At the bottom of this file you should find two lines that read:
;silent load
(princ)
Just above these lines we're going to tell AutoCAD to have a look for your customisation every time it loads a file, and to load your customisation automatically. You need to enter the following line:
(load "MyLisp.lsp")
I think it's also a good idea to make a comment in the file to remind yourself that this is where you edited the file. Any line of code in lisp that starts with a semi-colon ( ; ) is ignored by the program and treated as a programmers comment. This is the way to make notes for yourself inside your code. The end of my customised acad2008doc.lsp file looks like this:

Make sure your file looks the same, and then save it. Now to start the fun stuff!
Wednesday, April 11, 2007
In the beginning...
You've got AutoCAD. You've been using it for a while and you're getting pretty familiar with it. Great!
But now what?
If you're anything like me, after you become familiar with a piece of software you need to set it up to suit the way you work. It's time to customise!
Why customise? Customising ACAD helps you to work:
- quicker
- easier
- predictably
- more confidently
And I'm not going to show you how to use them. Not yet, anyway. I think it's important to learn how to do things the old-fashioned way first. Yeah, I'm serious!
We'll address this old-school approach in the next post, but first things first, we need to set up AutoCAD so we're ready to customise. So without further ado, let's begin...
The first thing that I suggest you do is create an empty folder called "Custom". This is where you'll keep all your customisation. From experience, I find this to be the easiest way to manage and maintain your custom files (and by far the easiest way to handle upgrading to newer versions of ACAD and retaining your customisation!)
I personally keep all of my custom files in a folder in the ACAD install path, so for me, the path of the customisation folder is "C:\Program Files\AutoCAD 2008\Custom\". This path can be anywhere you like, as long as you can find it easily.
The next step is to make sure AutoCAD knows where to look for your files. If you haven't already, fire up ACAD.
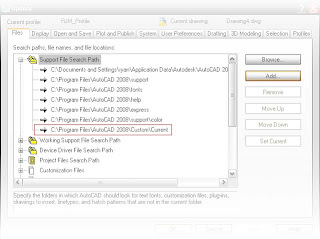
At the command prompt, type "options" and hit enter. (Alternatively, from the menubar, select Tools>Options...)
On the Options form that appears, click on the Files tab at the far left.
At the very top of the list that appears, expand the Support File Search Path list.
Click the Add button, and browse to the location of the folder you just created. Click Ok.

That's it. You've just completed the very first step. Next post: Customisation, the Old-School way...


